Drilling Jig
Homemade Jamieson Hollowing Tools
By Peter James - Hornsby Region
For those that don’t know what a Jamieson hollowing tool is you will find full information and pictures as well as construction details at http://www.lylejamieson.com/tool.htm .
This article is my interpretation and how I made the rest to fit my Nova 3000 lathe.
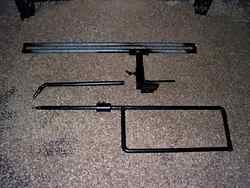
In the picture above (click the thumbnail to enlarge) there is the rest at the top with it’s associated tool post .
In the centre there is the bent tool shaft with cutting tip and at the bottom the straight tool shaft fitted to the handle.
The tool rest is made from two lengths of 20mm OD galvanised water pipe approx 500mm long with a short piece of 10mm flat bar between each end to provide a 19mm gap for the tool handle to slide in. This was then bolted to a short length of flat bar which in turn is welded to the top of a piece of 35mm OD gal pipe.
The outer section is a piece of 40mm OD gal pipe which is in turn welded to a piece of 10 x 50 flat bar. This is then locked to the bed by a threaded handle screwed into a short piece of the same flat bar underneath the bed. Locking levers are made by welding a short piece of round bar to the head of a bolt.
Measurements for all of the tool post parts may vary depending on your particular lathe, the width of the bed, the centre height etc.
The actual tools and handle were made by Harry Jones of the Hornsby region as I didn’t have the necessary equipment to bend the steel and taper the ends of the tool shafts.
The tool shafts are made from 19mm mild steel bar tapered at one end and drilled to take a 3/16" HSS cutting tip which is locked in place with a grub screw. The handle is also made from 19mm mild steel bar.
The tool shafts are connected to the handle by a 75mm long section of 19mm ID heavy wall tube welded as in the picture. There are two grub screws to lock the tool shaft in place.
Care must be taken when bending and welding the handle to ensure it remains flat so that in use it slides freely between the tool rest bars and maintains the correct cutter orientation to the timber being hollowed.
A quick spray of paint on exposed areas to slow down corrosion and it is ready for use.
I also applied candle wax to the rest bars to make the handle slide more freely.
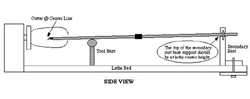
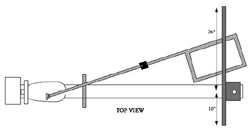
The diagrams below give an idea of the tool in use (click the thumbnail to enlarge).
I have made my rest smaller than the one above as I tend to turn vase type shapes rather than wide spaceship type bowls.
For those who have been reluctant to attempt deep hollowing or any hollowing because of the physical effort required on occasion this tool gives fingertip control with a total lack of risk or strain on the turner. Coupled with a laser to gauge wall thickness results can be achieved that some turners may have thought to be beyond their capabilities.
Back to the Articles page