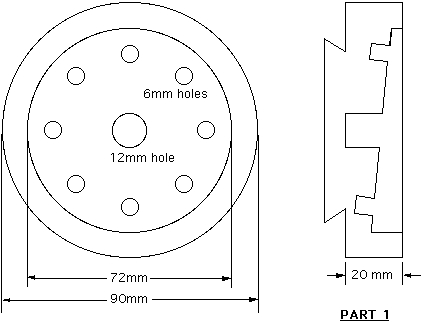
The jig consists of two parts, and rather than telling you how to make one I will make the drawings as clear as I possibly can. I am sure that after you study the drawing, you will have little trouble making this jig. I will however, give a few pointers to make sure that you do it right the first time.
- Make the jig out of dense hardwood. I used Melaleuca and Turpentine
- Make sure to drill the location holes at right angles to the face of the jig
- All measurements are in mm
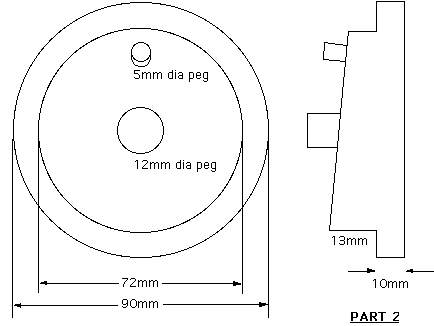
- When part 2 is located in part 1, and by rotating part 2 you will get a different angle every time you put the location pin into the next hole. The reason for this is that you are now in a position to install a blank to the face of part 2 at the angle most suitable for the job you want to do. Say the blank you have is 150 mm in diameter and 25 mm thick. You can now make a ring 25 mm in diameter at the thick end and 10 mm in diameter at the thin end. This can be done by selecting the correct angle. You must now bring the tailstock up and put the live centre in the centre of the blank and apply a fair bit of pressure, keeping in mind that the blank is held on with pressure only
- Now turn on the lathe and dress the face of the blank to an even surface but only in 30 mm from the outside diameter of the blank. Before you remove the blank you will have to mark it in relation to the jig. Now turn the blank over in the same position and do the same on the other side of the blank .It is a good idea to drill a small hole through the centres so you will have exactly the same centre on the other side. Hey, that was easy. The next thing you must do is to mark a new centre for the inside diameter of the ring 5 mm towards the thin end of the ring so you have 10 mm on the thin end and 20 mm on the thick end. Now take part 2 of the jig away, and put the blank against part 1 again. With the live centre in the centre of the inside diameter and applying a fair bit of pressure, with a thin parting tool push it just short of halfway through the blank. Do the same on the other side of the blank .I sure hope you understand all this. Now comes the tricky part
- Put back part 2 into part 1 at the same angle and the mark on the blank in the same position as before now bring the live centre back and put it in the centre of the outside diameter, again applying a fair bit of pressure
- Now turn the lathe by hand and you can see that only the thick end of the blank will come around once every revolution. If you turn on the lathe and look over the top of it you will notice a shadow. That is the part you will round off very carefully with a small detail gouge. It is a good idea to stop the lathe frequently and examine what you just have turned. Next take the pressure off the tailstock and turn the blank only to the next mark on the jig [do not change the angle on the jig]. Again turn the lathe by hand to make sure that the part you are rounding is coming around at the correct time making sure that you only turn the shadow you see. You have to do this until you have been completely around the job. Make sure that you do not lose the mark on the blank. Do the same on the other side. The next thing you will have to do is the inside of the ring exactly the same as the outside but you have to make sure that the tailstock is in the centre of the inside diameter. You go around the inside on both sides the same as you did with the outside
- After this is complete put the job back on the lathe with part 2 of the jig removed and it is now time to do some sanding on both sides. Then the next thing you have to do is to part it off. I donŐt have to tell you to be careful with that because you know. A little bit of hand sanding where you parted off, and you have now completed the project, hopefully successfully
- The only thing left to do is to cut the ring in half, and you have two elephant trunks---- well sort of
- The thing I found the most challenging was to cut the shadow but after several failures it became easier